THE Bread. Jalepeño-style.

This is THE bread, all.  THE Bread.

The Pioneer Woman came up with this recipe, and it contains two ingredients: Bread and Butter.  That's it.  And not JUST butter, TWO WHOLE STICKS of the stuff.  You know that when something calls for that much butter, it is definitely going to be good.  Oh and don't worry!  Butter is totally a super food now, so this recipe is not only delicious, but totally guilt-free too! (riiiight)


I was skeptical at first, but once I gave it a shot, oh my gosh, all... this stuff is crazy-good!

jalepeño sourdough, all melty-good and covered in butter
Even my husband wanted more, and he is extremely hard to please when it comes to food.  He even said he would pay money for the meal I made, and if you knew my husband, you would know that meant business.
under the broiler now; almost done!
 Do yourself a favor and give this recipe a try.  If you can run an oven broiler without burning the house down, then you can make this bread!  It is nearly fool-proof.

getting really crispy now; the flavor is taking shape
The original recipe calls for a loaf of french bread, but I decided to take it a step further and use a good jalepeño sourdough, and the final result completely blew my mind.

You can find the original recipe here; below is my version.
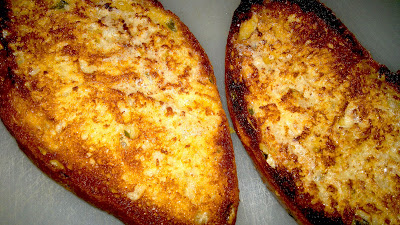
all done!!
all done!!
PRINTABLE
Ingredients: 
1 loaf jalepeño sourdough, Split Lengthwise 
2 sticks Regular (salted) Butter, Softened

Method:
1. Preheat oven to 350°
2. Spread one stick of softened butter on each half of the loaf
3. Place on a cookie sheet and bake for approximately 10 minutes, or until the butter is melted and is starting to soak into the bread.
4. Switch the broiler to high and broil the bread for 3 to 5 minutes.  Do not walk away!  You have about 1 minute before things start getting serious, so careful not to let it burn!
5. When the butter has started to brown and blacken, remove it. Don't under-broil it either though; the flavor really kicks in when the butter's color changes.
6. Slice into desirable chunks or strips and serve immediately.

close up of the buttery crumb


paired with spaghetti and meat sauce

Please give this a try and tell me how it turns out!

Bread preserved!

Quick Links:
The Pioneer Woman, The Bread
Empowered Sustenance, butter a superfood?

I'm going flippin' COCONUTS over here!

Is it just me, or are coconuts completely amazing?! It's like they have super powers or something!
Credit to: http://thepworth.blogspot.com/
Eating it can reduce bad cholesterol and increase good cholesterol.  Heavy cream can be exchanged for coconut milk in nearly all recipes and tastes just as good with a fraction of the calories (creamy soups, and whipped cream, and smoothies, oh my!). It can aid in teeth whitening, and now I've heard that it can be beneficial for your hair!

I decided to give it a try.  I mean, I had a nearly full jar of coconut oil sitting in the cupboard calling my name.  I HAVE to use it on SOMETHING.  It's just so awesome!

I have read many different methods, most of which involve heating the oil or wetting your hair first, etc, but since it melts pretty much as soon as it gets in contact with the skin I just spooned some out into my hand and went to smearing.  I rubbed it in from roots to tips and smashed the chunks really well into my scalp (wow, this sounds a lot more crazy now that I'm actually writing it out, ha!), which melted on contact.

The thing I love about coconut oil is that is such a light oil.  At first my hair was SOAKING it up, but once it got completely saturated I couldn't even tell by feel.  I had to actually look at my hands, and once I realized that the oil was no longer getting mopped up by my hair, but staying mostly on my hands, that told me that I had reached maximum capacity.

I then tied a grocery sack on my hair and wrapped that with a towel (I really should have snapped a picture of that.  I was extremely attractive, let-me-tell-you).  The whole thing took about 4 minutes to get all worked in and I only used about 2-3 tablespoons of oil (I have short-ish hair, but it is EXTREMELY thick, so that should give you a bit of a gauge).

Before I left the kitchen I grabbed another spoonful for my teeth (see my post on Oil Pulling to understand), and cozied myself up on the couch to watch some T.V. with the hubby and do some leg exercises.  The husband immediately looked me up and down, and then turned back to the T.V. like "Oookay, not even going to ask." but hey!  Sometimes it takes a crazy measure to look this beautiful all the time!

I gave myself about 1 hour and 45 minutes and then went to the shower to wash it out.  I highly recommend that if you use shampoo, you definitely invest in a sulfate-free type.  I will be blogging about this in the near future (and please feel free to leave comments about what you do now so we can exchange tips!)

I did my normal shower routine and, the verdict?  OMGOSH-BBQBURGERS-THIS.IS.NICE!

Credit to: http://blaze-libby.deviantart.com/
My hair is soft.  My hair is sleek.  My hair has BOUNCE, you guys!  Short hair is difficult to get bouncy, especially mine.  It really has a mind of its own, and usually that mind is wirey and wants to curve in all the wrong places.  It can be sculpted into submission with time, heat, and hair products, but that takes work.  I didn't even have to bust out the straightening iron and my hair rocks!  It's not straight, but it has this sleek bounciness that I'm just plain okay with!  I can't wait to see what happens when I actually spend some time on it!  I will be doing this coconut oil treatment on a regular basis, that's for sure.

Try it out and tell me how it works for you (and DEFINITELY tell me if it doesn't and I'll see what I can do to help!)

For more information on the science behind why this works, check out this SUPER good post on GNET for more information:

GNET, coconut oil hair treatment

Hair preserved!

To CT, with love...

I am dedicating this day and blog post to the memory of those who were injured and lost their lives in the horrible elementary school shooting that occurred today in Newtown, Connecticut.

I can't imagine rushing my baby kindergartner out the door on his/her last school day before Christmas break, only to get the call later that they had been shot and killed in the supposed safety of their classroom. This breaks my heart on so many levels.

Why babies? Innocent, little babies who couldn't possibly have had enough time in their short lives to have caused anyone to begrudge them.

We take comfort in knowing that they were innocents and are now at rest and waiting to see us all again one day, though I'm sure that is only a small comfort to the loved ones they left behind.

They will never go to prom, never get married, never know the joy of raising their own children, but at the same time we know that they will never have to experience a broken heart, a marriage gone sour, the death if a child. These little ones were spared these pains, but the victory is bittersweet.

These poor, poor, little babies and the families who are missing them right now... I cannot even fathom their pain.

"The LORD is close to the brokenhearted and saves those who are crushed in spirit."
Psalm 34:18 New International Version (NIV)

photo credit to:
Justin Lane / EPA
People gather outside a fire house near the Sandy Hook
Elementary School in Newtown, Conn. following a
shooting that left dozens dead, many of them young
children on Dec. 14. (MSNBC)

NY Times, shooting in CT

Simple Inspirations

Last year I was in an Aerobics class at my university. I had a LOAD of fun, which is not what I was expecting at all. I mean, as appealing as being all sweaty and gyrating around with a bunch of other sweaty people, communally sweating all over each other in a big pool of sweat sounds (ick, sarcasm and exaggeration, ick), I'd rather not have to do all of that AND put forth proper effort in order to obtain a passing grade, you know?

Credit to: http://www.takuchat.com/
Physical Activity courses are required however, so I figured I would pick this one and try it out... and you know what, all? I LOVED it! Me. The same person who sometimes skips class simply because the prospect of having to put forth the energy it requires to get dressed in the morning changes my mind. Me, who on the days I DO attend class, if the weather is the least bit foul, will ditch my bike in exchange for my car to help traverse those treacherous two blocks (my husband HATES that).  Yes me; I love aerobics!

Credit to: http://oedaday.files.wordpress.com
This specific Aerobics class has a different activity nearly every week. Sometimes it's step-aerobics, which were my favorite part because I can *actually* do it and don't think I look like TOO big of a doofus, as opposed to when I'm failing at bosu while the rest of my classmates are failing at not giggling at me (feel sorry for me please?.... no? That's okay; you're not alone).

My FAVORITE days however are the Circuit days.  Our instructor sets up the gym with a myriad different stations for us to hit and we each get a turn for a few minutes and then rotate clockwise. I had a hard time at nearly every single station, but the fact that I knew it would only last a minute or so made me push myself that much harder! I felt fine when it was all over with, but the next day (and subsequently, the next week and a half) I was soooooo sore!  Nothing would help. I could barely get out of a chair without my muscles feeling like they were being torn in two. I thought it just came with the territory. Working out = sore muscles.

The term ended shortly after that, and you know what? Despite the pain, I signed up again! Between that term and the one to follow I stumbled across an interesting tip on My Healthy Life Now involving oranges to aid your muscle-soreness, for which I am eternally grateful!

Credit to: http://myhealthylifenow.blogspot.com/
I remembered this tip before our circuit happened again (and this was after I had a baby and did nothing but stay at home loving on her all summer, so it's not like the first Aerobics class' benefits were still being reaped), and you know what? NO muscle soreness! I couldn't believe it! I would have two Little Cuties before class and maybe one afterward and I felt good before, during, after, and for days to come.

Credit to: http://www.bubblews.com
I highly recommend it! Worst-case-scenario, if it doesn't work for you then you are still getting some vitamin C (plus they are delicious!!).

Muscles preserved!

Try it out and let me know how it goes!

Quick Links:
My Healthy Life Now, tip on oranges

New Use for a Cake Stand!

I recently read about this cool idea from Jamielyn at I {heart} Nap Time for using a cake stand to keep your soap, sponges, and whatever else off of your counter top. We all know that it can be a damp mess up there, so any tips on making the area more aesthetically pleasing are always exciting!

Basically, you set the cake stand there and use a pretty rag for soaking up the moisture. It looks so chic and modern, yet a bit country-kitchen at the same time!

Credit to: http://www.iheartnaptime.net/
I found this cute alternative on Natalie's blog, Natalme, that shows how to make your own if you don't already have an extra cake stand laying around (which I don't).  Natalie used an old candlestick holder she had, spray painted it, and then epoxied it to a regular plate, which is a fantastic idea.

Credit to: http://www.natalme.com/
Beautiful, right? However, I don't have a candlestick holder like that, so I found another smart idea on Meredith's blog, Haute to Sew, for taking two regular Dollar Store items (that you can pick up today, for cheap I might add) and using the same method, come up with a very similar result!

Credit to: http://hautetosew.blogspot.com/
Countertop preserved!

Give this a shot and tell me how it goes!

Quick Links:
Jamielyn at I {heart} Nap Time, cake stand soap holder
Natalie at Natalme, DIY candlestick cake stand
Meredith at Haute to Sew, Dollar Store DIY cake stand

Stove Cleaning Tips

I'm excited! If all goes well I should be able to get the oven clean and everything tomorrow, you guys! Wishful thinking, I know, but I have a good (and natural!) solution to getting it done right! (my goodness... this shouldn't be that exciting, but my pad is a mess, people!)

Tracie at Cleverly Inspired came up with a great method for oven cleaning that won't choke you out with noxious chemicals.

PRINTABLE
Ingredients:
5 T baking soda
5 drops of Dawn
4 T vinegar
A lemon half
3 more drops of Dawn

Method:
Mix the first three ingredients into a paste (she mentions making a double batch if your oven is SUPER dirty). Rub the paste all over the oven with a sponge, close the oven door, let it sit for fifteen minutes and then come back and scrub it down. For the very tough/greasy sections add the last three drops of Dawn to a lemon half and rub the fruit in to those spots.

Credit to: http://cleverlyinspired.com
Now, next will be my stove burners.  I came across a method, which sounds super appealing, called "The No-Scrub Way to Clean Your Stove Burners" on Vivienne's blog, The V Spot. It involves ammonia, which I have never used and know nothing about, but I picked some up and I'm hoping for the best! 

Credit to: http://www.thevspotblog.com
I have spent countless hours attempting to scrub my burners clean with a Scotch Brite and numerous different cleaning products, but to no avail. I did find a replacement set by accident at Home Depot for approximately $14, which was very exciting, however we are tight on money so my husband vetoed that one. I really hope this works out for me! It sounds promising.

You basically take your offending item, seal it inside a bag with 1/4 cup ammonia, set it outside overnight, and the ammonia fumes break down the mess so you can wipe it clean in the morning.

Genius! Stove preserved!

I hope it works, and I will update you once I have tried this, and I hope you do the same for me!

Quick Links:
Tracie at Cleverly Inspired, oven cleaning
Vivienne at The V Spot, no-scrub stove burner cleaning

Housekeeping Schedule

I just finished my last final exam of the term! I had THREE today so I'm pretty stoked to be done and have a break.

I have decided to take next term off and I plan on being the best housewife/mother I can be, which means I will be working just as hard as before, if not harder, but the perk is that I get to be at home with my little precious all day, yay!

Sooo, guess what I'm doing tomorrow! Getting up at 7AM to start cleaning, woo! I know, I sound crazy, but this house is a PIG STY and getting it whipped back into shape is going to be just the thing I need. I am dreading it, but I've collected some tools to make things more manageable. Tomorrow is a big "gut out the house and get it back to square one" day, and from then on I will be utilizing a new tool:

Credit to: http://timewarpwife.com
Darlene from The Time Warp wife came up with an amazing template for a housekeeping schedule that really inspired and motivated me to get this stay-at-home-mom thing kicked off right. Click the link below to be taken to the original post by Darlene.

After really thinking about it, it makes SO much sense to tackle one major chore a day so that things never get out of hand. It becomes so frustrating to bust my bum cleaning the WHOLE house and make it a beautiful and fun place to live in for a change, and then three days later turn around and say "What happened to this place?!"

This housekeeping schedule is going to change my life! I'm going to tweak it a good deal in order to fit my specific situation of course, but either way, what a good idea! Kudos to you, Darlene! You smart cookie you!

Home preserved!

Tweak your own version and try it out; tell me how it goes!

Click here to visit Darlene's blog, The Time Warp Wife, and download her template.

Oil Pulling

Yesterday I stumbled upon this concept for detoxifying your mouth (among many other claimed benefits) called Oil Pulling. Check the "Quick Links" section below for more detailed information.

Basically, you take some sort of natural oil (I just happen to have purchased a new tub from Costco), put it in your mouth and swish it around for 15-20 minutes. Somehow the oil leeches toxins from your gums, loosens plaque and stains, and strengthens your teeth, etc. I figured, "Why not?" so I gave it a try.

Credit to: http://costcocouple.com

I flossed and then dove in.  Coconut oil is solid at room temperature so I had to chew a chunk until it melted in my mouth. NOT my favorite thing in the world, let me tell you. Some might not be bothered by this, but I definitely had a gag-factor for a moment.

Once it all melted, however, it was fine and tasted like nothing at all. I swished and strained it through my teeth with my tongue and basically just let it hang out in there and after about 10 minutes noticed that it started to take on a flavor... the flavor of bad breath! Yuck! It tasted like stale mouth and almonds, which tells me that SOMETHING was happening! After about 15 minutes my mouth was tingling ever so slightly and getting full of saliva (I know, yuck... but hey, I was starting to become a believer so I couldn't stop there!).

Once the 20 minutes were up I spit it out (don't swallow it; that stuff is full of awful things!) and rinsed my mouth with warm water.

I checked my teeth over and noticed an old coffee stain on my canine. I scratched it with my fingernail and it came right off!! Then I brushed my teeth and I swear they are at least two I shades whiter. I will definitely be doing before and after photos next time!

This was a great success, and for the plaque removal and stain-fighting alone, I think I will keep this up. At least once a week or so.

Teeth preserved!

Give this a try and tell me how it goes!

Quick Links:
Simple Homemade, oil pulling
OilPulling.org

One of THOSE people...

Yes, I'm one of THOSE people.

If you have a Facebook account you know the type I'm talking about. If something happens to me you can bet I will post a book about it. If my baby does something cute I will post numerous pictures of said cute event. If I exercise you will know. If I eat something/make something/see something amazing you will know. If I love a product you will know. Oh, and if you make the mistake of asking me "What's up?"... boy... You. Will. Know.

This being the case, I have decided to chronicle my life journey here rather than so explicitly on Facebook (you're welcome friends and family).

I plan to highlight life events, showcase my ideas, speak openly about my opinions, share great deals I come across, and generally have a good time.

My name is Jeannie and I am a full-time college student at an amazing university. I am a Psychology major working on my Bachelor of Sciences degree. I hope to one day become a Youth Psychologist. I love vegan eating and the benefits of said lifestyle, but at the same time I also love meat like no one's business and I am struggling on cutting back my intake. I am a loud, introverted, active, health-conscious, long-winded, overweight, organized, sloppy, video game playing, Netflix watching, Pinterest addicted, holisticly-living wife to a wonderful husband (as well as a new mom to one). I am one big, walking contradiction rolled into one and I know that. Maybe together we can work things out for the betterment of you and I both, dear reader ^_^.

You can expect to see posts about food, babies, coupons, housekeeping tips, money-saving ideas, holistic living, health and fitness, and everything in between. I don't expect to be able to form a huge internet following, but I do enjoy the thought of sharing my life's trials and triumphs in hopes of inspiring at least a few.

I have fallen off the ship of order and am now floating in a sea of crazy. If you happen to find one of those silly, yellow life preservers, please, go ahead and toss one my way, because I need it!

photo of a sea of leaves taken by me on the WWU campus